TMA Centered Bands indicator for MT4 draws bands onto the chart and shows you the overall trend in price. It plots three bands of red and green color and red-green color.
The top bands are red, the lower is green, and the middle is red-green.
These moving averages are broken down into bands, with each having an MA period. The name TMA is derived from triangular moving estimates, since the indicator draws triangular bands.
These bands will change as a trend develops, so the price will fluctuate within these ranges. This can lead to entry and exit points.
How to trade the TMA Centered Bands indicator?
TMA Centered Bands Indicator uses the power of moving averages to plot bands on the chart.
Each band has its own functionality. For example, if the price rises above the upper band, it is possible for it to reverse.
Similarly, if the price falls below the lower band, there is the possibility of a reversal. The middle band measures the trend and can turn green or yellow depending on which direction it is.
If the price rises above the upper range, you may take short positions. However, if the price falls below the lower range, you can also take long positions.
The middle band acts as a mediator between the upper and lower bands. A trend can change its direction by turning red or green. A green signal indicates an uptrend. Red indicates a downtrend.
Buy strategy
The price should be less than the lower band.
Let the trend in price continue.
The lower band is the best place to enter long trades.
Set a stop loss at the low entry point.
If the middle band becomes red, you can exit the trade.
Sell strategy
The price should be above the upper limit.
You can wait for the price trend’s continuation.
Trade the short position at the upper band.
Set a stop loss near the top of the entry point.
When the middle band turns green, exit the trade.
Conclusion
TMA Centered Bands Indicator can be used on any timeframe.
There is a possibility of loss because there is no holy-grail indicator.
Combining the TMA Centered Bands Indicator can be used to confirm the trend by using confirmation indicators such as moving averages and the RSI.
The MetaTrader Adaptive Renko indicator is a trend-following, non-repaint forex indicator. This powerful MT4 trading tool was built in accordance with the Triangular Moving Average (also known as the TMA Renko strategy).
Trading with the TMA Renko Strategy (which can be a bit complicated to understand) is easy with this indicator. It’s simple to use and produces a similar result as those who trade manually with the TMA Renko Strategy.
The Adaptive Renko indicator can be used to trade market reversals or trending markets accurately. It is a useful tool for novice traders who don’t have much knowledge about the Renko trading system. Professional traders can also save time using the indicator as it does the analysis automatically.
Is Adaptive Renko Trading profitable?
Renko trading system is one among the most profitable in the financial trading industry. It gained popularity after high-quality traders who used the Renko approach to trading could record high trade accuracy. However, the system can be difficult to understand for forex traders new and old. This indicator (Adaptive Renko), is invaluable.
What Timeframe is the Best for Adaptive Renko Charts?
You can use the Renko chart on any time frame that suits your trading style. However, for scalpers, lower time frames work best. For day traders and swing traders, higher time frames work best.
Adaptive Renko Indicator BUY/SELL Signals
This is how the Adaptive Renko indicator will look after installation. It comes with two sets (RED and GREEN), dotted and bold lines. The dotted lines can be used to gauge channel fluctuation. The bold lines double as support/resistance levels, and BUY/SELL signals.
It is worth noting that the Adaptive Renko indicator should be used in conjunction with price action to optimize entries/exits. This will help you filter out false signals, and ultimately increase your trade success rates.
BUY Setting: The Adaptive Renko indicator indicates a potential BUY/LONG setup once the GREEN line is drawn. To open a high-probability BUY trade after the price has shown a willingness (price action), you can refer to the screenshot above which shows a good BUY entry following multiple rejections.
SELLSetup When the RED boldline appears, it indicates an SELL/SHORT entry. To make sure you open a high-probability SELL entry, please wait for rejections at the support level. In this case, the REDbold line.
Keep in mind that you should always have a realistic Take-Profit or Stop Loss when trading. A ratio of 2:1-3 is a common fact.
Conclusion
The Adaptive Renko indicator MT4 is a great trading tool. You might consider adding it to your chart to see how accurate they are.
The CAP channel trading indicator, as the name suggests, is used to channel trade. In other words, it uses an envelope strategy in which the price falls within a channel bound by an upper or lower line.
The overbought area acts as the upper channel, and the oversold area acts as the lower channel.
This indicator is volatile and sensitive. It assesses the daily price differences of instruments to determine demand and supply areas.
The indicator can be used to trade any currency pair. It also works well for trading strategies that are either long-term or shorter-term, on timeframes of 15 minutes or greater.
How to Open Buy and Sell Signal Using the Indicator
Buy Signal
Wait for the price drop to get support in the lower band
Buy when the red cross appears.It is worth entering the trade after the closing of the bullish candlestick pattern.
Stop Loss below the most recent swing low
You can exit when the price crosses the upper band of the indicator.
Sell Signals
Wait for resistance at the top band to occur.
Sell when the indicator shows a green cross that indicates a market correction
Place your stop loss higher than the swing high.
You can exit when the price reaches or crosses the lower channelline.
Conclusion
The CAP Channel trading indicator can be a great tool for traders who use channel trading strategies. It plots price charts and factors in price volatility, and then plots an envelope where the price ranges.
As a trader you simply need to wait for the price line to touch it, post red crosses or blue crosses and exit when it touches the opposite channel line.
The 1vs Channel indicator is a simple MT4 indicator. It counts the number up and down bars to show the market direction. Indicator plots multiple lines to the chart. These lines create a channel around price. Indicator counts how many bars are within the channel to indicate BUY or SELL signals.
Additionally, there is FirstBar and DeltaBar in the Indicator. These bars represent up and down bars. On the right side, you will see the indicator showing the number of up bars and down bars within each channel. The 1vs channel indicator works best when it has higher time frames. Also, forex traders may use other indicators to confirm signals.
Conclusion
The 1vs Channel indicator for MT4 allows you to create a channel that will show you the up and down bars. Also, it is completely free to download, making it easy for forex traders to use.
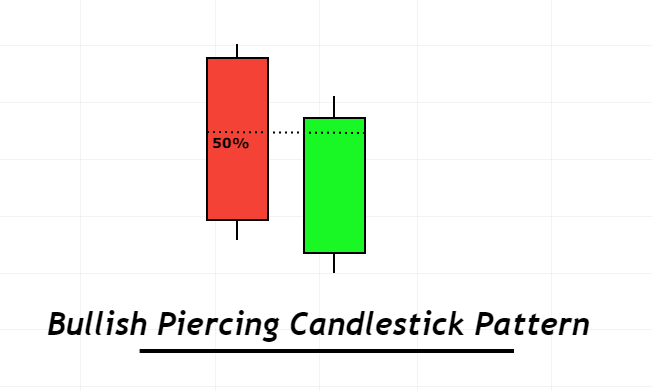
The bullish-piercing pattern is a Bullish Trend Reversal Candlestick Pattern that consists of two candlesticks. The recent candlestick closes at 50% above the previous candlestick. This causes a price trend reversal, from bearish to bullish.
How do you identify a pattern of piercing candlestick?
A piercing candlestick pattern is a simple pattern of candles that looks similar to a bullish pinbar but with a higher timeframe. A perfect strategy can give you profitable results when trading with it.
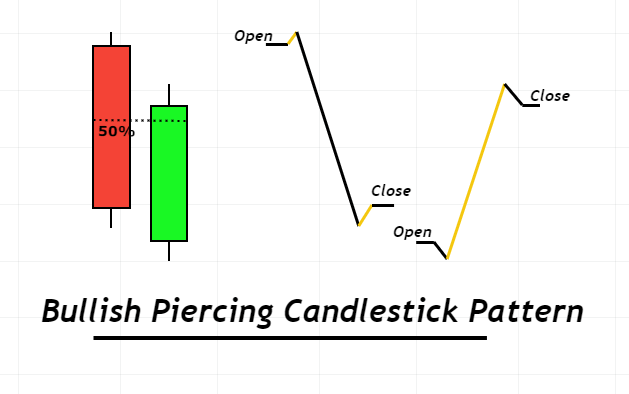
The ratio body to wick of bearish candlesticks should not be less than 60%. Because it should indicate strong selling pressure.
Bullish candlesticks should open below the low level of bearish candlesticks with a gap.
Draw a horizontal line at the 50% level of the bearish candlestick. This will make sure that the bullish candlestick closes above the 50% mark and below the close for the bearish candlestick. This is an important step.
The location of the candlestick pattern
The location of the candlestick pattern is crucial to achieving a higher winning percentage in a trading strategy.The candlestick pattern won’t work if it forms in a volatile market or a choppy market.We have narrowed down the locations where piercing candlesstick patterns can be used.
Support zone
Demand zone
Oversold level
Bullish Piercing Pattern: Information Table
Features
Explanation
Number of Candlesticks
2
Prediction
Bullish trend reversal
Prior Trend
Bearish trend
Counter Pattern
Bearish Piercing Candlestick
What does a pattern of piercing tell traders about trading?
The bullish pattern of the bullish piercing indicates that buyers have become more powerful than sellers.The strong resistance level is the 50% level in bearish candlestick.The gap in this price chart indicates high volatility and imbalance.
A gap in the market after a big bearish candlestick means that many sellers sold out currency, leading to oversold conditions.The gap is then closed with a huge candlestick that closes above the 50% bearish candlestick level.
This signifies that buyers now control and are in control of market, and that sellers have been removed from the equation.
This is why the piercing candlestick patterns are so popular.
Pro Tip: Before choosing a trading strategy, traders must be familiar with the logic behind it. It is important to be able to read the price chart and understand the market.
How to trade Piercing pattern?
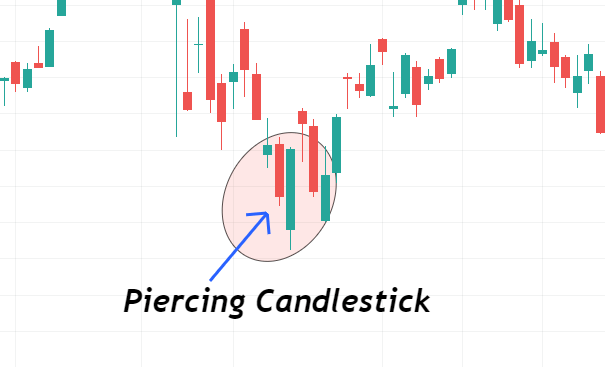
Because of its simplicity, bullish piercing candlestick patterns are easy to spot on candlestick charts. However, it can be difficult to trade one candlestick pattern without any other technical tools. That is why it is recommended that you trade the Piercing pattern using chart patterns or technical indicator.
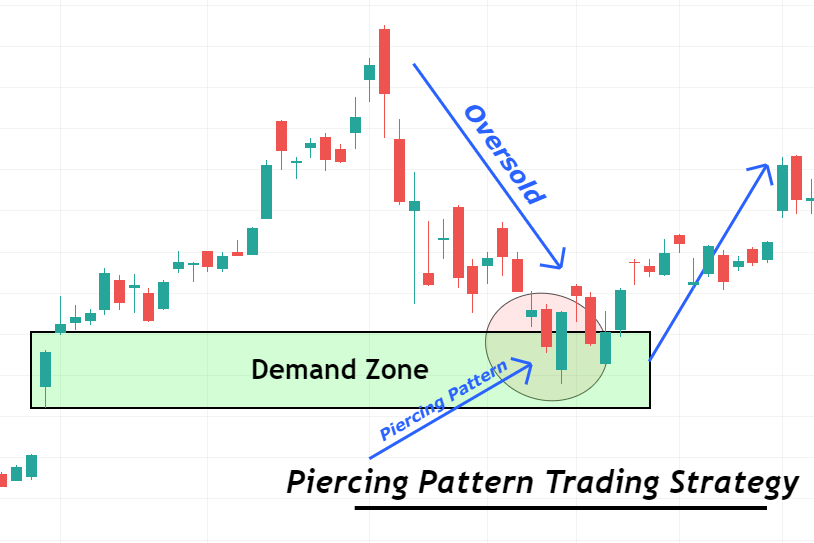
Trading strategy for piercing candlestick patterns
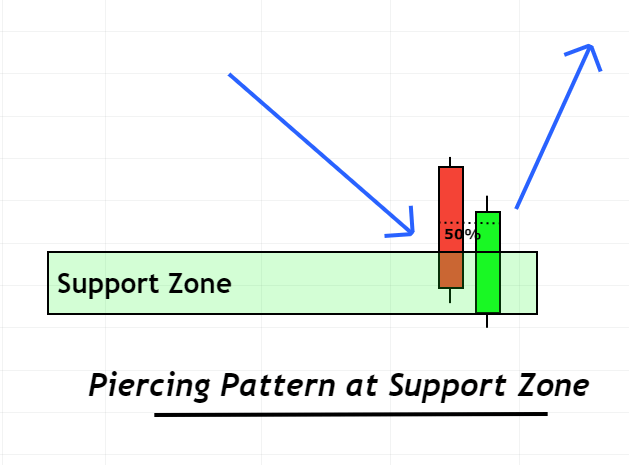
This is a simple strategy that relies on the piercing pattern combined with a confluence within the support zone.
Open a buy order
First, identify a support zone. Next, look for a piercing pattern of candles at the support zone. Although there is always a chance of trend reversal from strong support zones, the confluence candlestick patterns increase the likelihood of trend reversal.
After the formation of the support zone piercing pattern, open a buy trade.
Stop-loss level
Stop-loss should be placed below the support area. You can adjust the SL below candlestick patterns, but it is safer to place it below.
Profit Level
Close 75% trade at a 1:1 risk-reward. After that, you can break even the rest of the trade and let it continue until it reaches a 2:1 risk-reward.
Risk management
A piercing strategy for trading pattern trades should not exceed 2% of your total account balance. Your account size and the type of trading strategy will also impact risk management. Scalping is a strategy that involves trading more than 1%, while swing trading allows you to take on more.
Conclusion
A high probability candlestick pattern is the Piercing Candlestick Pattern. It represents a bullish pinbar pattern in a higher timeframe.
It is most effective in stocks because there is very little risk of gap in candlesticks due to the high trading volume.
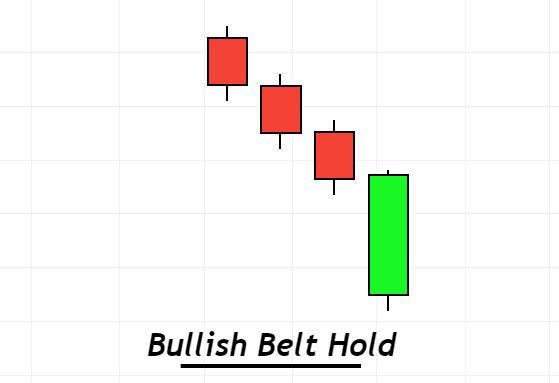
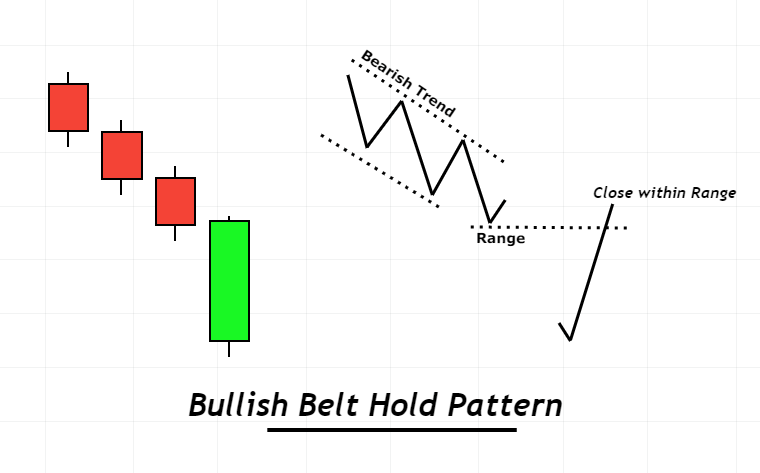
Bullish Belt Hold is an example of a candlestick pattern that follows three consecutive lower lows. A big bullish candlestick opens by opening with a gap and making a lower low before closing within the range.
The bullish candlestick should be small on the upper and not have any wick on its lower side.
It is a trend reverse candlestick pattern which transforms a bearish price trend into an upward trend.In stocks and indices, the belt-hold pattern is very common.High volatility means that there is very little chance of the belt-hold pattern in forex trading.
How can I recognize a bullish-belt hold pattern?
These steps will allow you to determine the belt hold candlestick pattern in the price chart.
Find three bearish candlesticks making lower Lows consecutively on the chart
After three lows, a bullish candlestick opens lower than the previous candlestick and then closes within its range.
A bullish candlestick needs to have a little shadow on the upper side, and no shadow on the lower side. It should be wider than the range of previous three candlesticks. It should not be a tiny bullish candlestick
These three parameters are necessary to determine if there is a belt held candlestick on the chart. The pattern is one candlestick. However, the other three candlesticks can be used as conditions to maximize trading performance.
Bullish Belt Hold: Information Table
Features
Explanation
Number of Candlesticks
4
Prediction
Bullish trend reversal
Prior Trend
Bearish trend
Counter Pattern
Bearish Belt Hold
What can bullish belt hold candlestick reveal to traders?
It is a good idea to understand the reasons behind a candlestick pattern before you trade it.The reason will help you make the right decision when trading stocks and forex.
The chart shows three bearish candlesticks. This indicates a market that is in a bearish trend.This is because sellers have used their full potential by opening a new candlestick that has a gap at the low of the previous candlestick.
The market was already in an oversold position, but a bearish gap confirmed that sellers had used all their power.The market will now be flooded with buyers.
The big bullish candlestick that engulfs the gap and closes within the range of its previous candlestick indicates that buyers now control the market and have overthrown sellers.This indicates that a bullish trend is about to begin.
To identify a bearish trend reverser, you should use a bullish candlestick pattern with a bullish hold candlestick pattern.
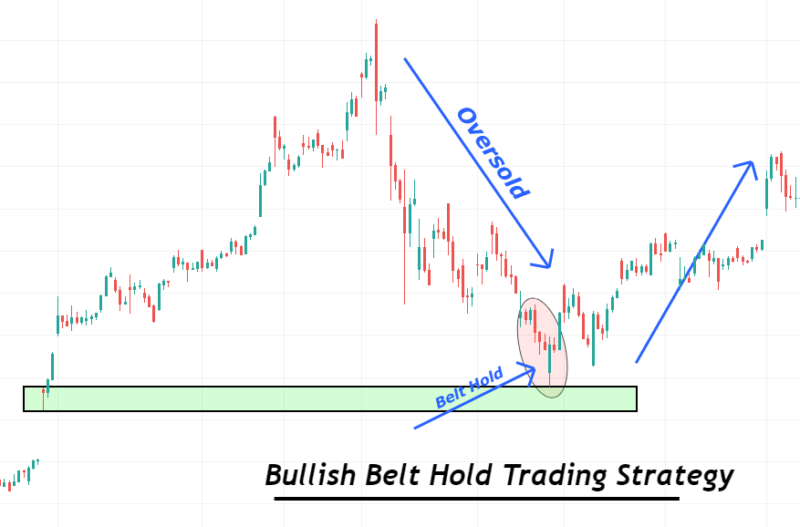
How to trade the bullish belt pattern?
For best results, it is recommended that you trade candlestick patterns together with technical analysis tools. This is the Bullish Belt Hold Trading Strategy. This strategy is a combination of two confluences.
Support zone
Bullish belt holds pattern
Open a Buy position
The price chart should show a strong support area. The support zone is likely to cause a trend reversal.
To increase the likelihood of a trend reversal, you should look for a bullish-belt hold candlestick pattern in the support zone.
Open a buy order immediately after the formation of the candlestick patterns.
Stop-loss Level
The support zone is the safe stop-loss limit. Stop-loss of a buy order should be placed just a few pips lower than the support zone.
Take-profit Level
When an order reaches a 1:1 risk/reward ratio, close the 75% of total trade.Keep the trade open until you reach a 1:2 risk-reward ratio.
Pro tip: Use bullish belt holds candlestick patterns with technical chart patterns to increase risk-reward ratios.
Conclusion
Belt hold is a simple chart pattern, but there are very few chances that it will occur in major currency pairs due to high volatility and small gaps on the chart.This pattern is highly probable for both stocks and indices traders.
New traders are advised not to trade candlestick patterns without the confluence and technical indicators. A candlestick pattern can only work in trend, but it won’t work in range.
To avoid trading false patterns, make sure you backtest the candlestick pattern.
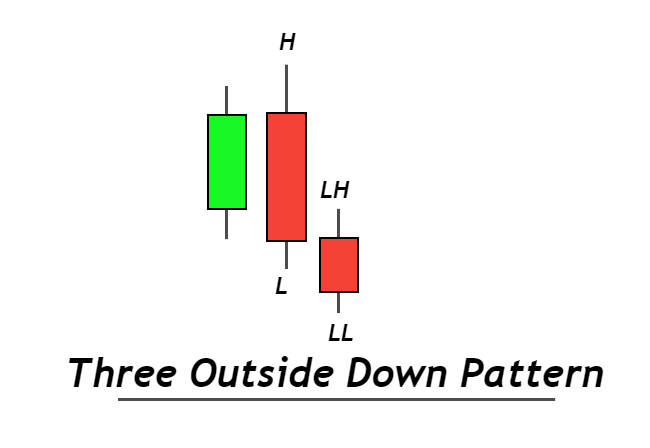
Three outside down is a pattern of bearish candlesticks that includes three candlesticks in one pattern. This pattern indicates a bullish trend reversal.
It is composed of two patterns that confirm a trend reversal.
Engulfing candlestick pattern
Pattern with lower lows and higher highs
An engulfing candlestick acts like an outside bar, and then a small candlestick makes a lower low to confirm that the bullish trend has been transformed into a bearish one. Because of the convergence of trends, three outside down is an extremely useful candlestick pattern.
How do you identify the three outside down candlesticks?
This candlestick pattern is composed of three candlesticks that are on the price table.Follow the steps below to find the perfect pattern on the price charts.
First, identify the perfect bearish-engulfing candlestick pattern.You can also use an outside bar pattern, but bearish Engulfing is more powerful.
A bearish candlestick will be formed on the chart if it confirms the engulfing pattern.
If the above two steps are completed, then three outside down bearish patterns will be formed
Each day, false price patterns are formed on the chart. Avoid these false patterns.
Avoid candles that have a smaller body than the wick.
Large wicks can be indicative of indecision in a market, while large bodies indicate momentum for sellers/buyers.
If a Doji candlestack forms after the engulfing patterns, then it will not become a three outside down. Doji candlestick represents an interruption in trend, but it won’t reverse the price trend.
Three Outside Down: Information Table
Features
Explanation
Number of Candlesticks
3
Prediction
Bearish Trend Reversal
Prior Trend
Bullish trend
Relevant Pattern
Engulfing candlestick
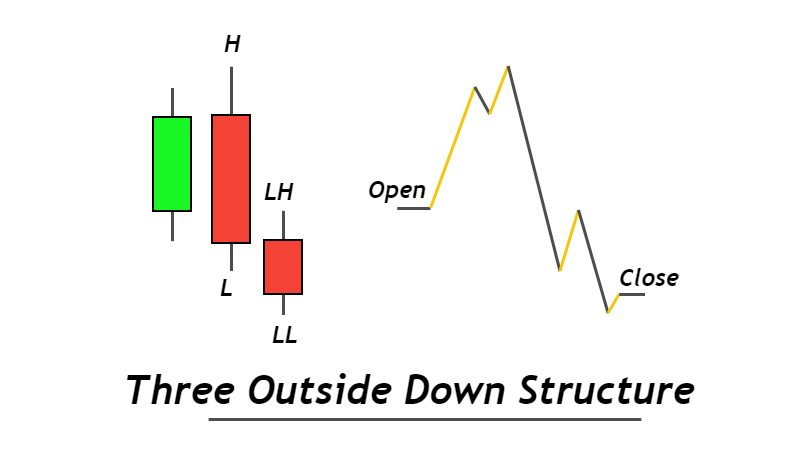
What can three outside down reveal to traders?
Each candlestick pattern shows the trading activity behind the chart. If a bearish engulfing form is seen, it means that sellers have overpowered buyers. The market is now controlled by sellers who want to lower the price and start a bearish trend.
The bearish trend is not yet confirmed. The engulfing pattern is a sign that buyers have been defeated by sellers.
A bearish trend is confirmed when a bearish candlestick appears after an engulfing pattern. The market is controlled by sellers.
Best trading conditions
These are the best trading conditions to trade three outside down candlestick patterns:
Supply and Resistance Level
Conditions that were overbought
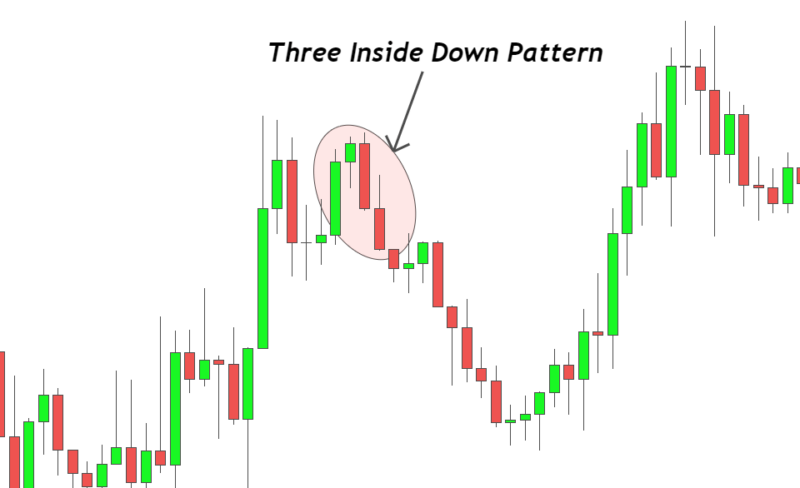
The probability of trend reversal increases when a three-sided down candlestick pattern forms near the supply or resistance zones. Because the ley level is where price most often bounces off.
Overbought conditions are a sign that the bullish trend is likely to reverse. The probability of trading winning increases if there is a three-outside down pattern that forms in overbought conditions.
To make a strong trading strategy, it is always advisable to filter the best trading conditions.
How to trade three outside down pattern?
Any indicator or chart pattern that is bearish can be used to trade with three outside down candlestick patterns.
This is a three-outside down trading strategy that I have simplified with some confluences.
Protip: Always create your own strategy using your rules and filtering odds.
Confluences that add
To increase the winning percentage of this candlestick pattern, you will need to combine three confluences.
Analysis of Higher time frames
Supply levels or resistance
Fibonacci tool
You can open a sell order
Once you have confirmed the three outside down patterns, it is time to identify a bearish pattern on a longer timeframe. Retail traders should trade in the direction and not against institutions.
Next, check whether the key level is a Supply or Resistance . These levels not only increase the likelihood of a trade setup, but also allow you to adjust stop-loss amounts.
Once you have confirmed the previous two steps, it is time to open a sale order immediately.
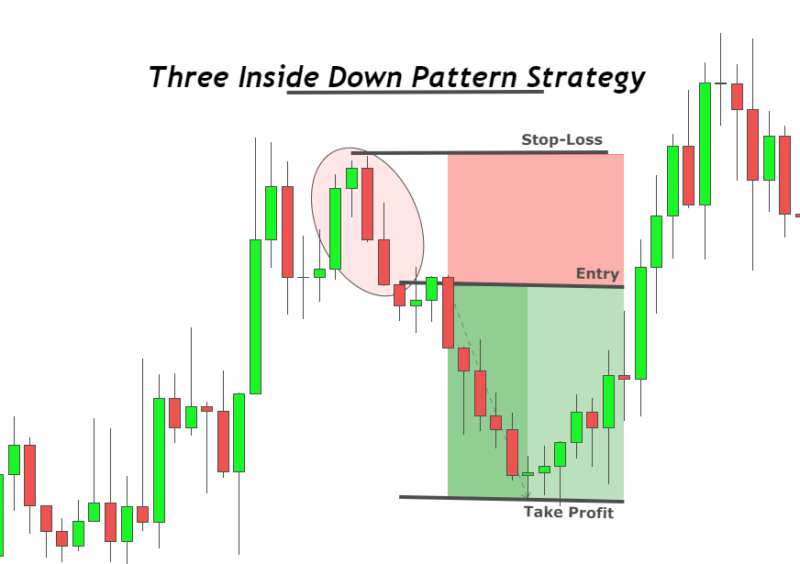
Stop-loss Level
The stop-loss level should not be lower than the supply area. You can adjust it above the three outer down patterns, but a level higher than the key levels is safe.
Take-profit
The Fibonacci extension tool can be used to determine take-profit levels. Fibonacci can be drawn from the entry-level level to the highest of three outside down patterns. Highlight the 1.618 Fibonacci extension levels. These levels will act as take-profit levels.
The bottom line
This is the best way of identifying a bullish trend reversal trade setup in the price chart. Technical analysis is the ability to analyze the price chart technically to understand the ideas of institutions.
This is the best way to learn how to read the market without spending too much time on screen.
Backtesting is a time-consuming activity that can help you discover price patterns.
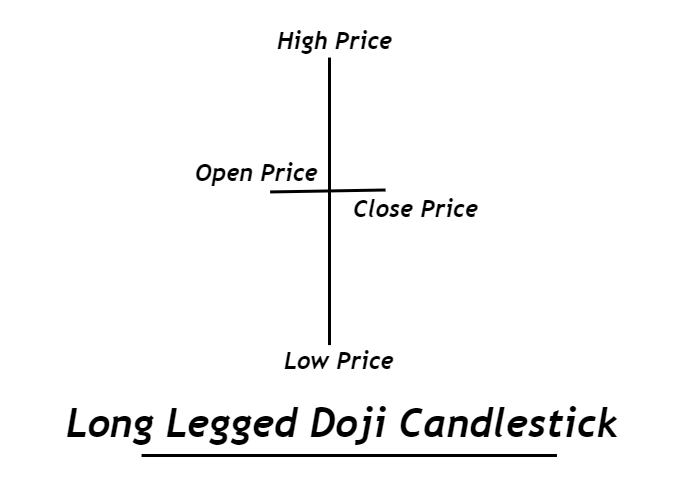
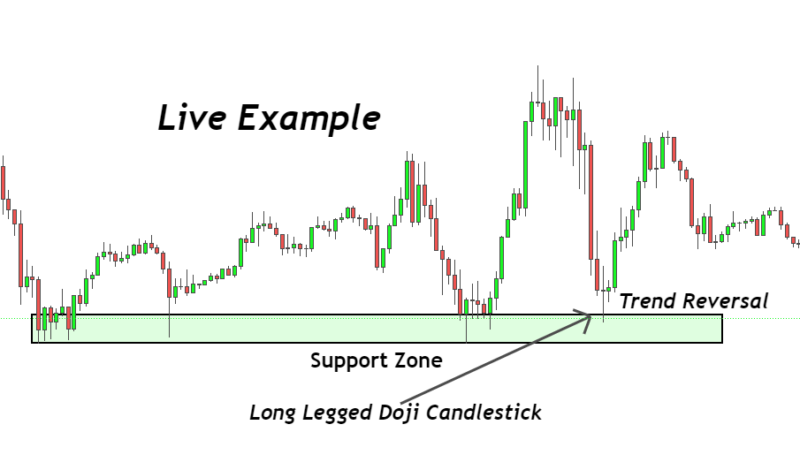
The long-legged Doji Candlestick is a Doji candlestick with a longer lower and upper wick. All Doji candlesticks are the same in terms of their opening and closing prices. There is a slight difference in the high and low prices between Doji types.
Doji with long legs symbolizes indecision in the market. The market’s future direction is determined by the long shadows at its upper and lower ends. This helps to identify the market structure.
How do you identify long-legged Doji
Follow these steps to find the Doji candlestick’s long-legged position on the price chart.
Confirm the doji candlestick with the same opening and closing prices
The doji candlestick should have long shadows at the top and bottom.
The size of the upper and lower shadows should roughly be equal
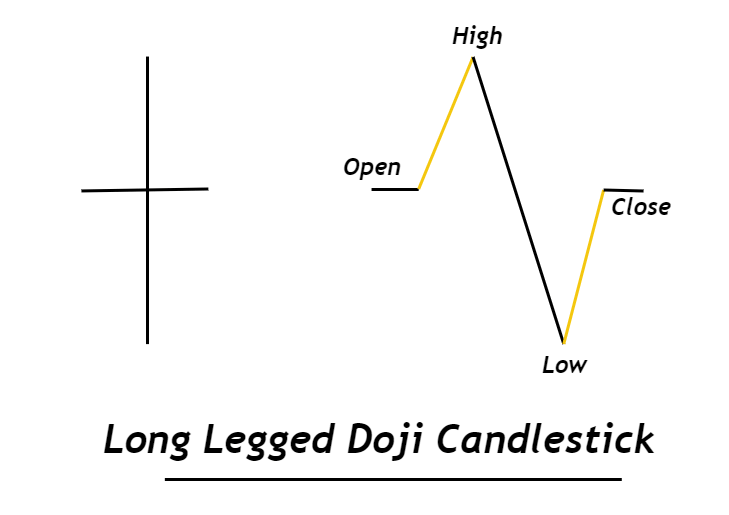
Structure of Doji candlestick with long legs
We concluded from the candlestick that it has the same opening price and closing price. But the candlestick’s structure shows the ranging period. This means that the price moves in a sideways direction during the shorter timeframe.
Most candlestick patterns indicate a trend reversal signal or trend continuation signal, but the long-legged Doji signals a pause in a trend. This is the consolidation phase after an impulsive period.
The long-legged Doji will see the price move down after the candlestick opens. It will then rise above the opening prices. At the end, it will return to the opening price and then close the candlestick making a long-legged Doji.
Take a look at the image below to get a better idea of the structure of candlesticks
Long Legged Doji: Information Table
Features
Explanation
Number of Candlesticks
1
Prediction
Indecision in the market
Prior Trend
N/A
Relevant Pattern
High Wave candlestick
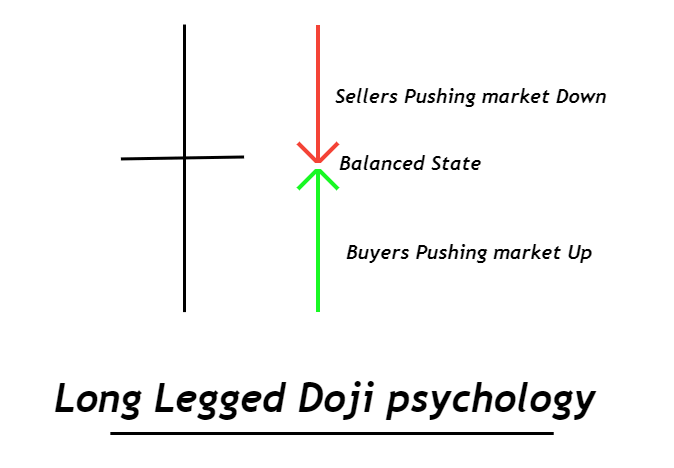
Long-legged Doji trading psychology
Each candlestick has a story. To become a price action trader, you will need to be able to read the stories behind candlesticks.
The long-legged Doji candlestick is an example of equal power. Both buyers and sellers have the same opening and ending prices. This is the fundamental idea that prices will rise if there are more buyers than sellers, and vice versa.
The number of sellers and buyers are almost equal during long-legged Doji candlestick form, which is why the price moves in a sideways direction.
The long-legged Doji candlestick formation shows that the price is in a neutral state. Only an unbalanced state will cause prices to move up or down.
Breakout of Doji candlestick
The Doji candlestick’s high and lowest levels act as support and resistance. A bullish price trend will be created if Doji candlestick’s high is broken. Conversely, a bearish price trend can begin if Doji candlestick’s low is broken.
Trading strategy
Trading a long-legged Doji candlestick alone is not possible. To make a trading setup that works, you need to combine confluences with the Doji candlestick.
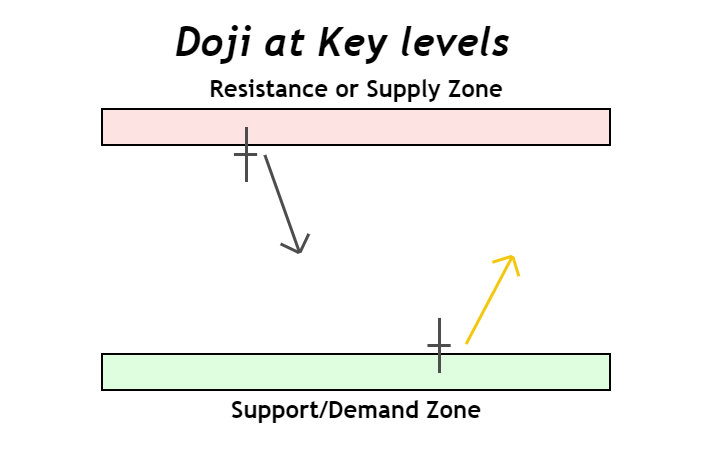
First, filter the Doji candlestick’s best working conditions. If a Doji candlestick with a long neck forms at a key level ( resistance or supply/demand level), then there is a greater chance of trend reversal/trend continuation.
However, if there is a Doji formation within a market structure that is not ranging, the price will continue to move side-by-side until a breakout.
Confluences that add to strategy
Key level
Higher timeframe analysis
Breakout of high or low of doji candlestick
Key levels
To increase the chances of winning in trades, it is crucial to use key levels.A Doji candlestick that is long-legged forms at the support area. The breakout of Doji’s high will indicate a bullish tendency.
You have increased the chances of a bullish trend reversal by adding a confluence Doji breakout to increase the likelihood of this trend reversal.
Higher timeframe analysis
Trading strategies must include a higher timeframe analysis. This is the way to trade with institutions. Zoom out and examine the trend using the lower high and higher-low methods. Next, match your trade direction to the trend.
Breakout of high or low candlesticks
This is only for long-legged Doji candlesticks. This will help you decide on the trade direction. If you’re looking for a reversal of a support area, then the high of Doji candlestick should be broken.
If you are looking for a trend reversal due to resistance or supply area, then the low Doji candlestick should be broken.
It serves as confirmation of trade entry-level.
Pro tip: Draw horizontal line on the high and low sides of long-legged Doji candlesticks.To confirm a breakout, switch to a lower time frame and wait until the candlestick closes above or below these horizontal lines.
These are the three strategies you should use when trading long-legged Doji candlesticks. The strategy you use determines the stop-loss or take-profit levels.
The bottom line
One candlestick can hold many secrets. To accurately predict price trends and reversals, you should read candlesticks that are formed at the key levels.
Candlesticks of long-legged Doji form often on the price charts, but you should only trade those that form at key levels.
You should backtest the Doji candlestick thoroughly and you can try to read the market using shorter time frames.
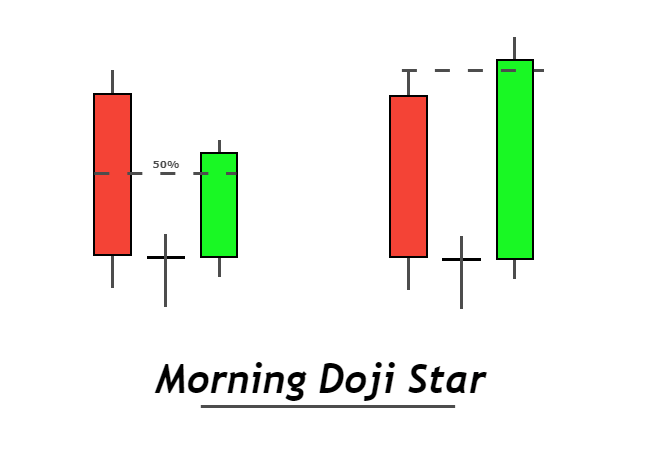
Morning Doji Star consists of three candlestick patterns: a bearish candlestick, Doji candles, and a bullish one.
This indicates that buyers have taken control of the market.To become a price action trader, it is crucial to understand the logic behind each candlestick.Trading technical analysis is best done by learning to read the market.
How do you identify the morning Doji star
A combination of a Doji candlestick and a large bearish candlestick creates a morning Doji star. To find the perfect candlestick pattern on the chart, there are some criteria that you must follow.
Follow these steps
The body to wick ratio for a bearish candlestick should not be less than 70%. This indicates a large body candlestick. It is directly related to market momentum.
The opening and closing prices of Doji candlesticks should be the same. This candlestick should be the same size as the other candlesticks.
Bullish candlesticks should have at least a 70% body-to wick ratio.
In the morning doji-star pattern, it is important to know what the closing price of a bullish candlestick is. There are two other methods. Both are excellent and the winning ratio depends on where the price chart is located.
Method 1 A bullish candlestick should close at 50% above the level of a bearish candlestick. This is a high level, and closing above it means that the price has broken through strong resistance and is now ready to move higher.
Method2 A bullish candlestick should close at the top of a bearish candlestick. This signal is strong and indicates large momentum for buyers who control the market.
Morning Doji star: Information Table
Features
Explanation
Number of Candlesticks
3
Prediction
Bullish trend reversal
Prior Trend
Bearish trend
Counter Pattern
Evening Doji Star
Morning Doji star psychology
Morning Doji stars indicate that buyers are ready to transform the bearish trend into an upward trend.
A bearish candlestick is a sign of a downtrend that has a lot of sellers.The market is controlled by sellers.The formation of a Doji candlestick signifies that buyers and sellers are in balance.
Doji candlesticks were controlled by sellers before buyers entered and balanced the market’s momentum.
A big bullish candlestick is the next candlestick after Doji candlestick. It represents the strong momentum of buyers entering the market and absorbing sellers.The market is now controlled by buyers.
This is a slow change in market momentum, from selling to buying.Before you can trade price action, it is important to understand the logic behind each candlestick.
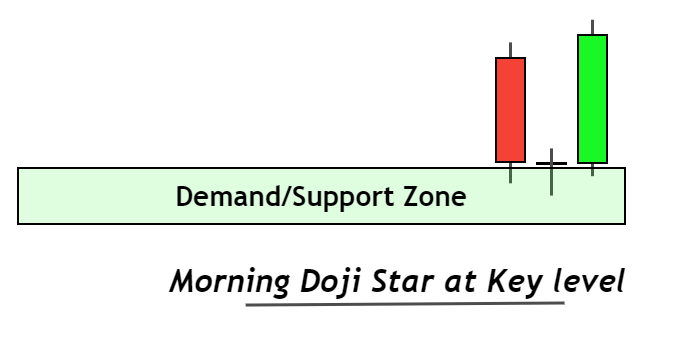
High Probability Morning Doji star patterns
If it forms on a strong support level, or in a strong demand zone, a morning doji star candlestick pattern is considered high probability.
Trades are all about finding confluences that increase your chances of winning. The price can jump from a support or demand zone.
The chances of a trend change from bearish to bullish increasing if a bullish candlestick pattern, such as a morning Doji Star, forms at the key area.
For a better understanding, see the image.
A candlestick pattern alone cannot be used to trade without the help of other chart patterns. While a candlestick may give a reversal signal, it cannot tell a retail trader what the take-profit level is in technical analysis.
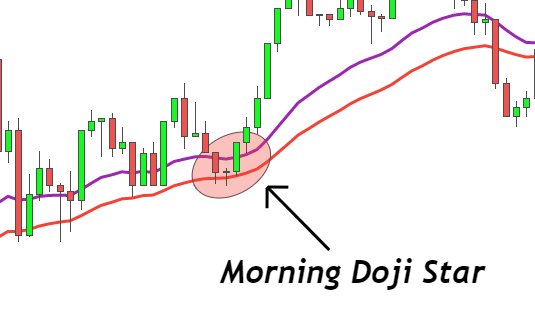
We will be discussing a morning Doji Star trading strategy using the confluences of moving averages.
Strategy to include confluences
Confluences to be added in strategy
21 and 35-period exponential moving averages
Higher timeframe trend
Fibonacci tool
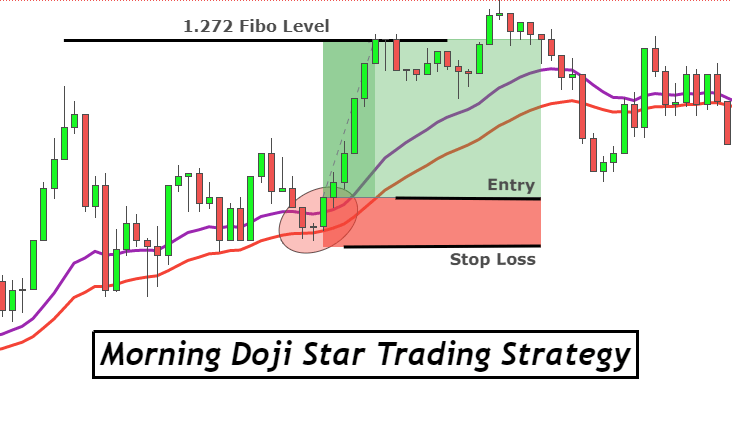
Trading strategy
Here’s the complete guide to trading strategies in 3 steps
Zoom out on the price chart to identify higher-frequency trends and label higher highs or lows.
The exponential moving averages should be used to determine if price retraces. The span between 21-35 periods of EMAs should be minimal.
On the EMAs, look for a morning dojistar candlestick pattern. The price should reject the moving average lines. Price rejection means that the moving average lines are strong enough to hold the price upward.
Pro Tip: Use the highs and lows of daily candlesticks to check the higher timeframe trend.(for beginners)
Make a buy order
Place a buy order above the top of the bullish candlestick. The formation of false candlestick patterns has been made easier by a waiting order.
Stop-loss level
Stop loss should be adjusted a few pips lower than the Doji low.
Take-profit level
This extension tool uses Fibonacci to determine target levels for this trading strategy. Place your take-profit 1 at any price above the swing high.
Here, the origin/start of the retracement will also be a swing high.
Draw the Fibonacci tool now highlight the 1.272 Fibonacci Extension Level. Place take-profit 2 at the 1.272 extension level.
Risk management
The minimum risk/reward is 1:2.You should only take 2% per trade on your account balance.
Conclusion
This pattern can be traded with the confluences of technical price patterns. If you plan to trade the doji star pattern by itself, you might not be a successful trader.
You should make it a habit to read the price before you analyze it and backtest your strategy at least 100 more times to get it right.
FAQs
Which time frame is best to trade the morning Doji Star pattern?
The best timeframes are 1H, 4H and Daily.
What’s the difference between Morning Doji Star pattern and Morning Star?
The first candlestick pattern has a Doji candlestick, while the morning star pattern has a spinning bottom candlestick.
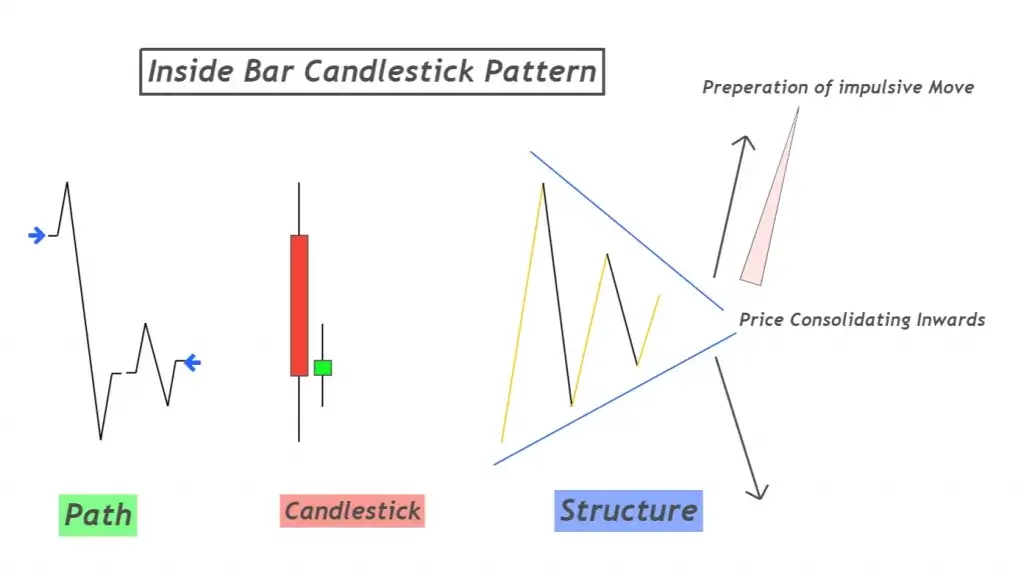
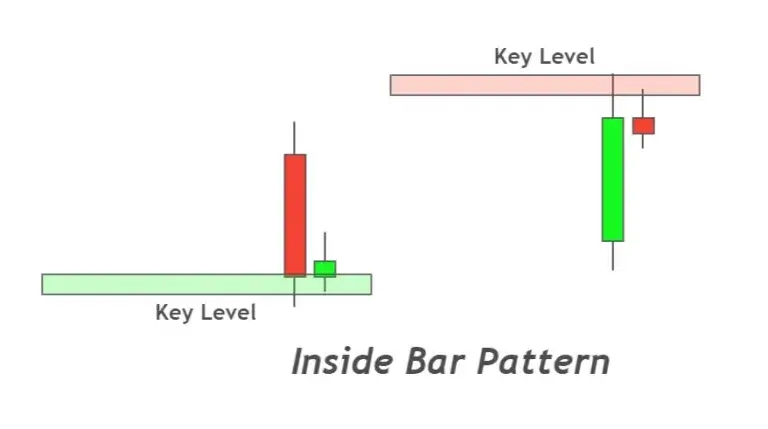
Inside bar is a pattern of candlesticks that includes two candlesticks. The most recent candlestick will be formed within the range of previous candles.
This is the most popular candlestick pattern, and it has a clear logic. If you use it correctly, you can be a profitable trader.
How to identify inside bar pattern
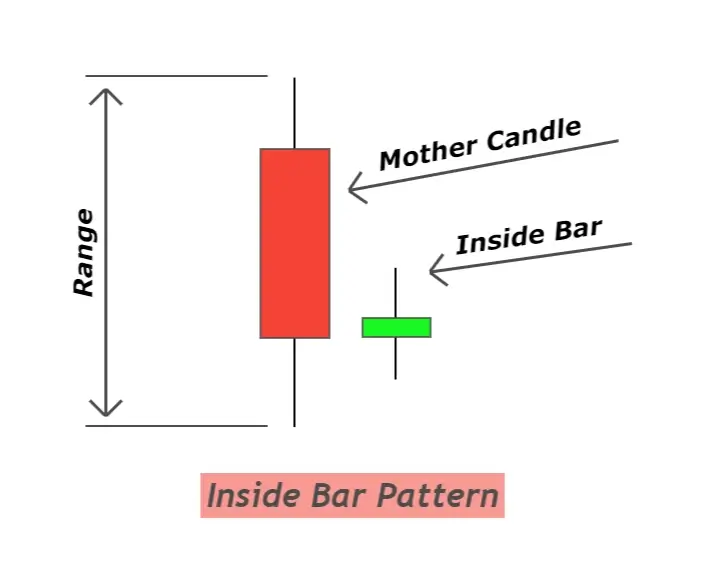
The inside bar candlestick pattern has the mother candle as the second candle, and the new candle as the inside candle.The high and lowest of the inside bar candlestick will fall within the same range as that of the mother candlestick.
Mother candlestick (MB).
Inside bar candlestick (IB)
Inside bar candlestick: Information Table
Features
Explanation
Number of Candlesticks
2
Prediction
trend reversal/continuation
Prior Trend
N/A
What does inside bar candlestick tell traders
Indecision in markets is represented by the inside candlestick pattern. This is a sign that the trend is continuing or reversing in forex markets.
If an impulse wave causes an inside bar to form, it is trying to send traders a message that the market is deciding about its future direction. The market’s future direction is determined by big traders and institutions when the inside bar breaks.
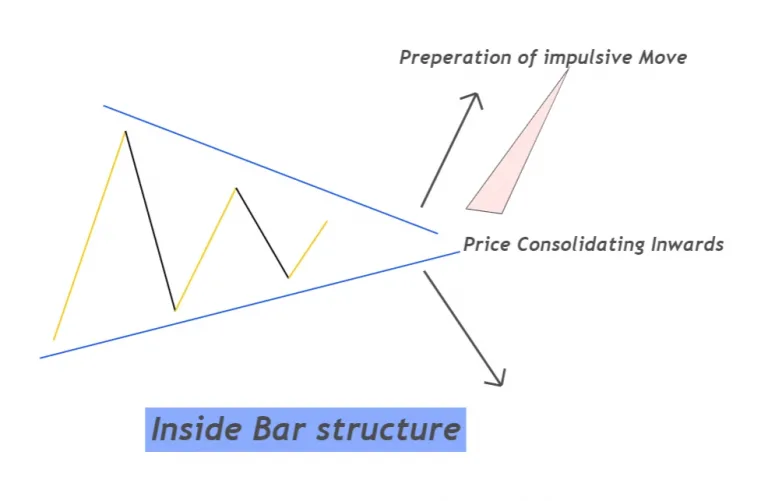
Let me show the structure within the bar pattern. This clearly shows the indecision of the market as it moves inward. Every wave that follows will be smaller than the one before. This is also a sign of the market’s upcoming storm.
It is natural that It’s the calm before a storm
Characteristics of best inside bar pattern
You will see the inside bar form many times a day on the chart for different currency pairs. However, is every inside bar pattern useful? No!
Certain criteria/parameters are used to distinguish the best inside bars from others. These criteria will help you to make a winning trade if the inside bar pattern is in line with these criteria.
The location of the inside bars pattern is the main criteria. It will not work if inside bars form within a market structure, that is not a reversal.
Inside bar location on chart
Key levels (support/resistance level)
Fake out level (inside bars formation after faking it out in the marketplace)
Trend lines (after trendline breakout)
Moving average (formation inside bar after moving-average breakout).
Is inside bar a bullish or bearish pattern?
The inside bar pattern is neither a bullish pattern nor a bearish pattern. Breakout of inside bar candlestick decides the future direction of the market.
In simple words, we can say
If the high of the inside bar candlestick breaks, then the market will stay bullish.
If the low of the inside bar candlestick breaks, then the market will stay bearish
How to trade inside bar pattern
Combining the inside bar with the moving average breakout creates a winning breakout trading strategy.
A moving average breakout is already indicative of a trend reversal for a currency pair.
If an inside bar appears just after the MA breakout, it is a sign that the decision zone has been reached. Price will decide whether to reverse the trend or return to the MA to continue its current trend.
You will need to understand these confluences. If the moving average breakout occurs in a bearish direction and the inside bar breakout occurs in a bullish direction, then both confluences will be against each other. We will therefore prefer to avoid this.
We want them both to move in the same direction. If the moving average breakout occurs in a bearish trend, then the inside breakout must occur in a bearish trend.
It makes sense, This setup increases the likelihood of a trend reversal after an inside bar breakout.
Strategy for inside bar breakout
A moving average breakout is when a big candlestick breaks through the moving average line, and then closes on the opposite side of the MA line.
Candlesticks must have a large body ratio.
Inside bar breakout refers to the breaking of a high or low inside bar candlestick.
To find a trade setup, follow the three steps below in a sequential order.
Exponential moving average line (21 period)
Breakout of EMA with a big candlestick (avoid Doji candlestick at breakout level)
Identify inside bar formation after EMA breakout
Once a trade setup is identified, the breakout of an inside bar will determine whether to trade it or not.
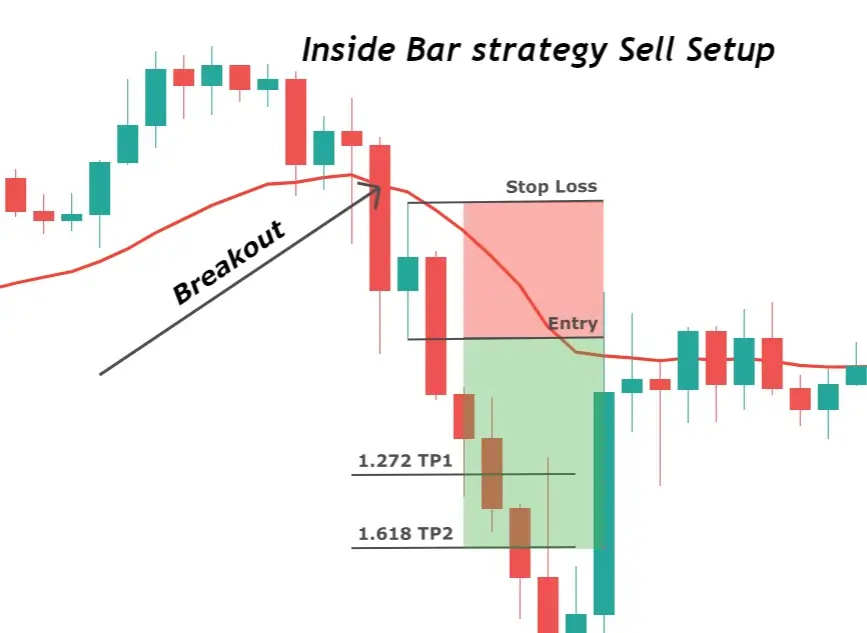
Sell trade setup
The inside bar of the sell trade setup breaks in the direction for bears. It formed with a low number of inside bars.
Placing a pending sell order (sell stop order), below the low point of the inside bar. You must immediately delete the stop order if the inside bar’s high breaks before its low point.
Only inside bar sales are allowed.
The stop-loss level is a few pips higher than the highest of the inside bar. When adjusting the stop loss, remember to include spread
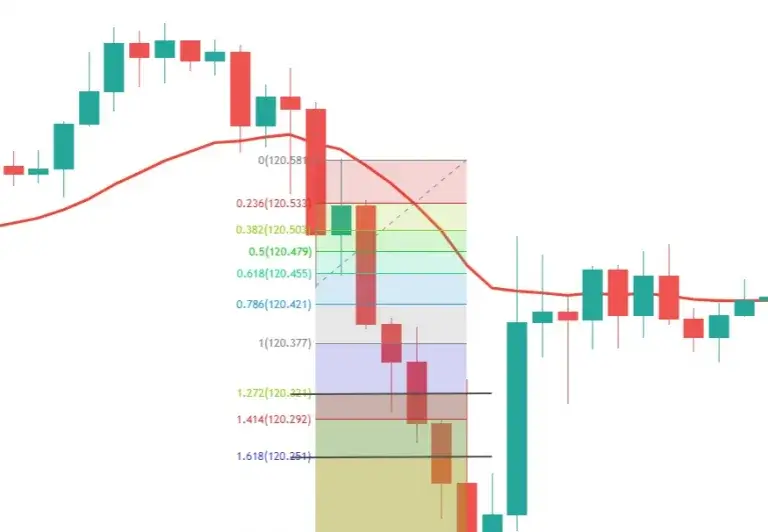
Fibonacci extension tool within bar trading strategy calculates the take-profit level. Use the trend-based Fibonacci extension to your trading view platform.
Drag the tool from high to low on the big candlestick, then connect the third point with the high of your inside bar.
There are two take profit levels
1.272 Fibonacci extension level
1.618 Fibonacci extension level
This is an easy inside bar breakout sell trading setup.
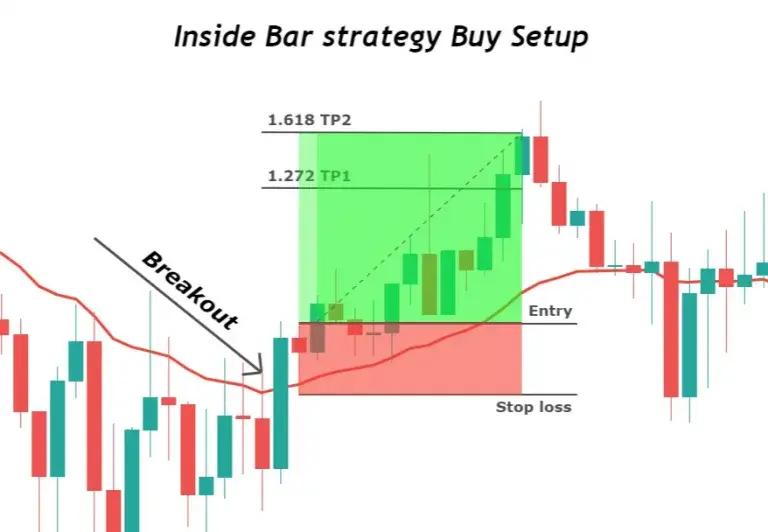
Buy trade setup
This is the opposite to a sell-trade setup. Breakout of MA must occur in a bullish direction.
Place a buy stop order at the top of the inside bar.
If the low end of the inside bar is broken before the high, we will immediately cancel the pending order.
The stop-loss level is below the low end of the inside bar.
Use the Fibonacci extension to to identify take profit levels. Only two levels of take profit will be used
1.272 Fibonacci extension level
1.618 Fibonacci extension level
This is the best inside-bar strategy that relies on price action.
Conclusion
The inside bar candlestick design is a natural one. It works and will continue to work because it reflects a natural trend.Try to understand the psychology of this pattern and then trade it.
In the next article, I will discuss the 3 most advanced inside bar strategies that use price action.
Understanding the price action logic is key to creating a trading strategy.This will allow you to automatically capture the best trades using a single chart view.
FAQs
Is it important to choose the right color for the inside bar candlestick?
The color of the inside candle is irrelevant. Because the inside bar is indecision. Only the market’s direction can be determined by the breakout of its inside bar.
Which is the best time to trade the inside-bar candlestick?
Trading inside bar patterns is best done in a daily timeframe. You can trade the inside bars on 30M and any other timeframes above 30M.
This article will be extremely interesting to traders who are looking for price action strategies. The only difference is the timeframe. To master price action trading, learn the facts about price actions.
Many traders know that the price will drop after a bearish pattern. However, the price will rise after a bullish pattern. But they don’t know the facts and aren’t willing to dig into the engulfing patterns.
Engulfing is the source of price action. As a forex trader, I can tell you that this is true. Let’s begin with the basics and move on.
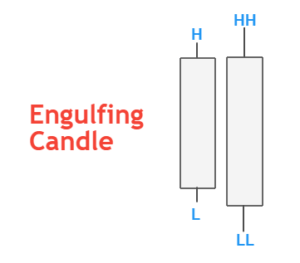
Engulfing candle
An engulfing candle is a candlestick that completely engulfs the previous one. There are two other types of engulfing candles.
Bullish engulfing
Bearish engulfing
Engulfing candles must be done in a specific way.
The high of engulfing candle must be higher than the previous candle
Low of engulfing candle must be lower than the previous candle
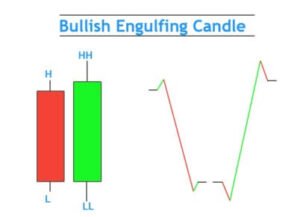
Bullish engulfing candle
A bullish engulfing candle is a sign that a bearish tendency has been reversed and that a bullish tendency has begun. It means that the closing price of a candlestick will be higher than its opening price (green color), and will make a higher high or lower low based on the previous candle.
Trades should be done correctly using an engulfing candlestick. However, it’s not necessary to make a higher high or lower low. A Doji Candle can sometimes make a higher or lower low.
In this case, the Doji candle is also an engulfing pattern, but it is not tradeable. The Doji candle is a pause in the trend. It does not represent a change in trend.
To trade only correct engulfing candlesticks, there are two requirements
The candle’s body must not exceed 75% of the total size.
The bullish engulfing candle should be located at the swing high.
Bullish Engulfing: Information Table
Features
Explanation
Number of Candlesticks
2
Prediction
Bullish trend reversal
Prior Trend
Bearish trend
Counter Pattern
bearish engulfing
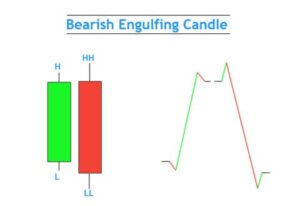
Bearish engulfing candles
The bearish-engulfing candle signifies that there has been a reversal in the bullish trend. This means that the price of candlestick will fall. (Red color). It will also make a higher high than the opening price and a lower low compared to the previous candle.
All tips and tricks for trading only the correct engulfing candles will be the same as those discussed in the section on bullish engulfing candles.
These are the criteria for a profitable bearish-engulfing candlestick
Only 75% must be used for the Body of Bearish Engulfing Candle.
The location of the bearish engulfing candles must be at a swing high point.
Engulfing Pattern
The first and most important reason for price action in technical analysis is the engulfing pattern. Every pattern has an engulfing point at some time in price action.
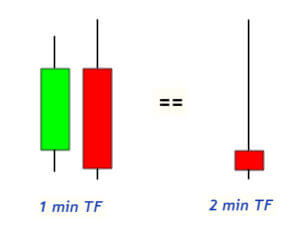
Every price action pattern has an engulfing pattern. You don’t need to change timeframes. Zoom out to see the chart. Higher timeframe and Lower timeframe can both be analyzed using a single timeframe.
What is forex engulfing?
Engulfing is a complete cover-up. It means that either sellers have completely covered the forces of buyers, and the price is now in their hands, or buyers have completely covered the forces of sellers, so the price is now in their hands.
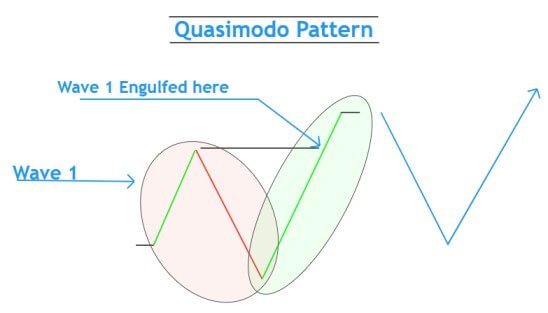
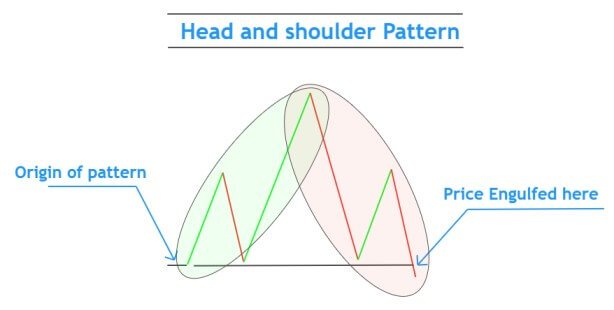
You will see some patterns that are engulfing patterns. You will find Quasimodo patterns, pinbar patterns, head, and shoulders patterns, double-top pattern, three-top pattern and many other patterns. Take a look at the images below for a better understanding.
The Quasimodo pattern shows the green wave that engulfs the red wave. This indicates a trend reversal.
Pinbar also comes from the engulfing pattern.
The head and shoulder pattern shows that price rises first, then falls, and then engulfs the origin of the price. This creates an engulfing effect.
It is also the same for a double-top, two-bottom and triple top three-bottom pattern.
This is the power-of-engulfing pattern, and it is the most important in price action trading.
There is no Price Action without an Engulfing Pattern.